
During an asbestos inspection, you'll start with pre-inspection activities, like reviewing existing records and preparing risk evaluations. Then, a thorough visual inspection identifies potential asbestos-containing materials (ACMs) by evaluating areas commonly affected, such as insulation and flooring. If suspect materials are found, sampling follows, conducted by qualified professionals to minimize disturbance. These samples are sent to a laboratory for detailed analysis using specialized microscopy techniques. Finally, you'll receive a report detailing findings, recommendations for management, and compliance protocols. The process guarantees safety and adherence to legal requirements, guiding you to understand the necessary steps.
Pre-Inspection Activities

Before diving into the asbestos inspection process, it's crucial to conduct thorough pre-inspection activities that set the stage for a successful evaluation. Start with pre-inspection planning by reviewing existing asbestos records and historical documents. You'll want to prepare a risk assessment and method statement that outlines the scope of the inspection and identifies areas possibly requiring special access or destructive inspection methods. A preliminary walkthrough plan is critical for pinpointing potential asbestos-containing materials (ACMs).
Next, focus on pre-inspection data collection. Gather relevant data about the building, including its construction date and materials used. Reviewing blueprints and architectural plans will help you identify potential ACM locations effectively. It is likewise important to compile information from previous asbestos inspections or removal activities, as this can guide your current assessment. Be sure to document any known asbestos materials and their locations, as this information will be vital during the inspection. Additionally, ensure that you have a clear understanding of the legal framework and requirements governing asbestos inspections to maintain compliance.
Finally, guarantee compliance with legal and regulatory requirements, informing occupants and securing areas to prevent unauthorized access. Proper preparation guarantees that your asbestos inspection is thorough and compliant with necessary standards.
Visual Inspection
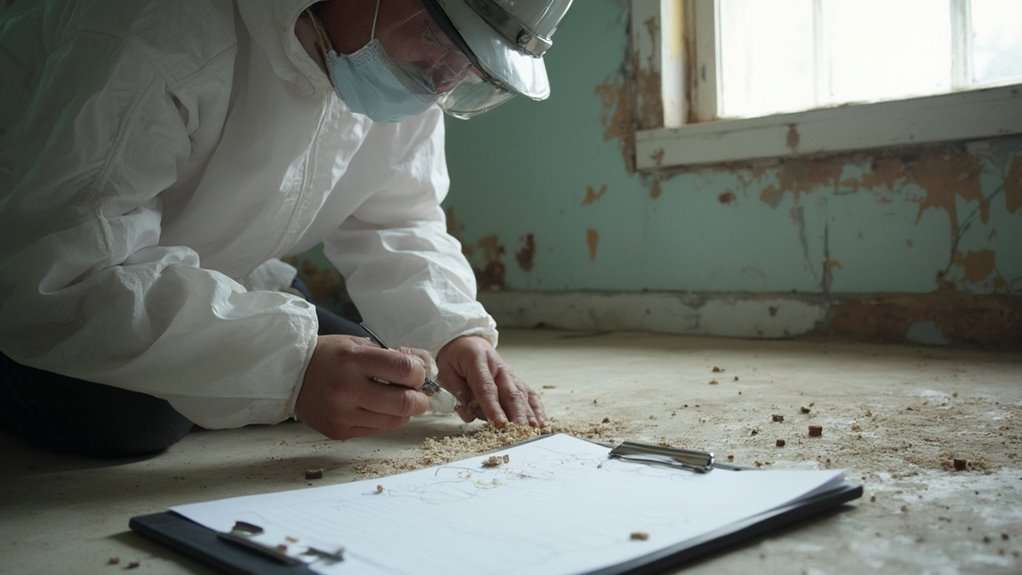
During the visual inspection, you'll look for signs of damage in materials that may contain asbestos, such as frayed edges, water damage, or deterioration. Identifying suspect materials is vital; this includes any tiles, insulation, or textured coatings that may not be immediately recognizable as asbestos-containing. Thorough documentation of these findings will inform subsequent actions and guarantee compliance with safety regulations.
Signs of Damage
How can you effectively identify signs of damage during an asbestos inspection? Start by focusing on common areas where asbestos-containing materials (ACMs) are typically found. Inspect insulation, flooring, and ceiling tiles closely for any signs of deterioration. Look for fraying, crumbling, or unusual dust, as these can indicate damaged materials that may release asbestos fibers.
Pay special attention to buildings constructed before the 1980s, as they are more likely to contain ACMs. Examine insulation around pipes or boilers for crumbling or deteriorating conditions, and inspect vinyl and linoleum tiles for wear and tear. When evaluating ceilings, look for cracking or peeling in popcorn textures.
Unexplained dust can signal friable conditions, where materials are easily crumbled and may release fibers into the air. Document your findings meticulously, as this information is crucial for risk assessment. A detailed inspection plan should be established based on your observations, identifying specific areas for further sampling and analysis. By conducting a thorough visual inspection, you can effectively pinpoint potential hazards associated with asbestos exposure.
Suspect Material Identification
A thorough visual inspection is essential for identifying suspect materials that may contain asbestos. You'll begin by reviewing the historical context of the building and performing an initial assessment to pinpoint potential asbestos-containing materials. The inspection involves a detailed physical examination, focusing on various material types, which include floor tiles, insulation, and mastic.
During the location assessment, you need to inspect accessible areas such as attics, basements, and service ducts. Look for signs of degradation that could indicate potential disturbance. Document your findings systematically to support risk assessment and further analysis.
Here's a simple overview of the process:
| Inspection Aspect | Details |
|---|---|
| Material Types | Floor tiles, insulation, mastic |
| Location Assessment | Attics, basements, service ducts |
| Condition Assessment | Evaluate for signs of disturbance |
| Sampling | Collect samples for laboratory analysis |
After identifying suspect materials, label samples with their location and condition for accurate tracking. This meticulous approach guarantees that you're prepared for any necessary remediation actions.
Sampling Procedures
Effective sampling procedures are vital for precisely evaluating the presence of asbestos in building materials. To guarantee accuracy, a qualified person with the necessary training and experience must perform the sampling, following regulatory guidelines like those in 40 CFR Part 763.86. It's imperative to minimize disturbance during sampling to limit exposure to asbestos fibers. Techniques typically involve using water mixed with detergent to mist the area before taking samples.
When collecting samples, aim for at least 2 square inches of hard material or 2 tablespoons of loose material. Be sure to capture all layers, including paint and texture, to maintain sample integrity. To prevent cross-contamination, collect multiple samples of the same material and keep them in separate, sealable plastic bags. After sealing, damp wipe the outside of the bags and place them in a second bag for added security.
Label each sample bag clearly with pertinent information, such as the sampling location. Finally, use tape to seal the area from which you took the sample, preventing any asbestos fibers from escaping into the environment. Following these procedures guarantees a reliable assessment of potential asbestos hazards, as early identification of potential hazards is crucial for effective asbestos management.
Laboratory Analysis
Once samples are collected and secured, laboratory analysis plays a pivotal role in determining the presence and type of asbestos in the material. The process begins with sample handling, where samples are delivered in airtight containers to prevent the spread of asbestos particles. Under a particle hood with negative pressure and HEPA filters, analysts open these containers and examine the samples using microscopic techniques.
Initially, stereomicroscopy helps in fiber identification by evaluating the fibers' appearance and physical properties. Once potential fibers are identified, polarized light microscopy (PLM) confirms the type of asbestos present. During this step, analysts measure various properties, such as morphology, color, and pleochroism, to verify accurate identification.
For more detailed analysis, analysts may employ transmission electron microscopy (TEM) when necessary. Throughout the entire process, safety protocols are strictly followed, with all testing conducted by UKAS accredited laboratories. Trained P401 qualified analysts prepare samples meticulously, guaranteeing they are examined and disposed of safely. After six months, any remaining samples are disposed of by a registered asbestos firm, maintaining compliance with all regulatory standards.
Recommendations and Reporting

Following the completion of an asbestos inspection, the next critical step involves preparing a thorough report that outlines the findings and provides actionable recommendations. This report must meet specific report requirements to comply with regulations and to guide future actions regarding asbestos management.
Your report will typically include:
- The location and condition assessment of asbestos-containing materials (ACMs).
- Recommendations for ACM management plans, distinguishing between materials in good condition and those requiring removal or sealing.
- Conclusions about the necessity for abatement options, including air monitoring and operations & maintenance plans.
- Details of the surveyor's credentials and the laboratory that analyzed the samples.
These recommendations are crucial for preventing unexpected costs during renovations and guaranteeing that all asbestos issues are addressed proactively. By following these guidelines, you can effectively manage ACMs, protect investments, and prioritize safety. Remember, accurate reporting not only fulfills regulatory requirements but also serves as a valuable reference for any future assessments or maintenance efforts.
Safety Measures
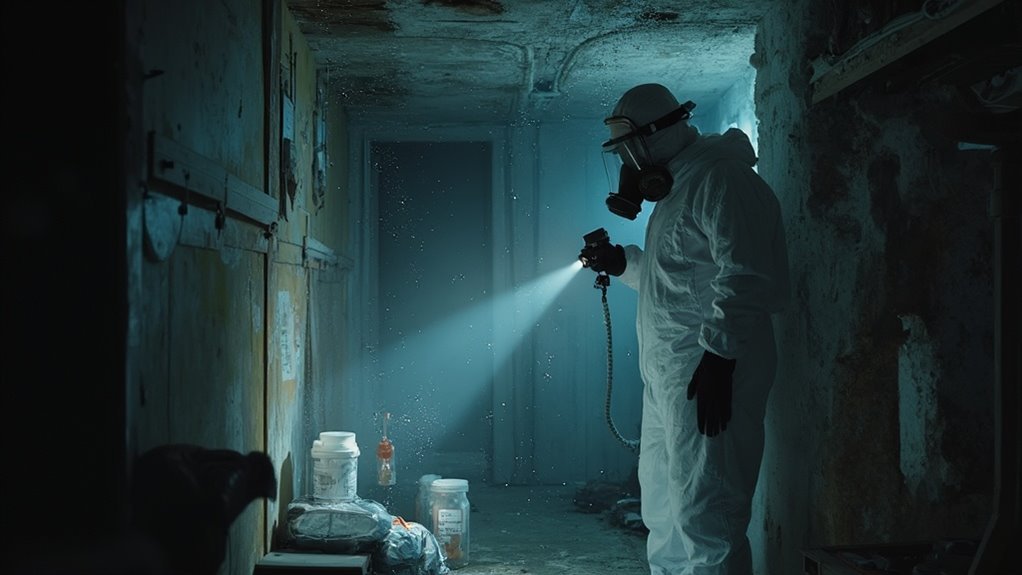
When preparing for an asbestos inspection, using the right personal protective equipment (PPE) is essential to safeguard your safety. You need to wear high-barrier coveralls, respiratory gear, and other protective items that fit securely to prevent asbestos fibers from penetrating. Furthermore, employing specialized sampling techniques minimizes the risk of releasing dangerous fibers into the air during the inspection process.
Personal Protective Equipment (PPE)
Personal Protective Equipment (PPE) plays a critical role in safeguarding workers during asbestos inspections by providing a barrier against harmful fibers. Understanding and adhering to PPE protocols is crucial for minimizing asbestos risks. Proper PPE includes:
- Disposable coveralls, head covers, and foot covers made of synthetic fabric
- A half-face filter respirator fitted with a class P1 or P2 filter cartridge
- Disposable gloves and a disposable hat to prevent contamination
- Airtight fit of respirators to prevent no leakage
Ordinary dust masks are insufficient; specific respirators designed for asbestos work are essential. Make certain that your respirator complies with Australian Standard AS1716 and maintains a clean seal, especially if you're male, as facial hair can compromise fit. Wear your respirator until all work and cleanup are complete, and remember to remove contaminated clothing carefully while still protected.
After the inspection, decontaminate effectively by sealing contaminated clothing in asbestos waste bags and taking a thorough shower. Following these PPE protocols not only protects you but also helps prevent cross-contamination, guaranteeing everyone's safety during the inspection process. Additionally, it is important to contact professionals for safe asbestos assessment and removal services to ensure a secure environment.
Specialized Sampling Techniques
The specialized sampling techniques employed during asbestos inspections are crucial for ensuring safety and minimizing exposure to harmful fibers. First, you'll want to minimize disturbance to the area by lightly misting it with water mixed with a few drops of detergent. This helps reduce the release of asbestos fibers. Use a HEPA-filtered vacuum and a water spray bottle to control dust effectively.
When collecting samples, take the smallest piece possible to limit airborne dust generation. Use a knife or chisel gently to avoid creating debris, and immediately seal the sample in a durable, labeled container. This documentation should include the date, time, location, and address. After sampling, seal the surface with tape to prevent fiber escape and lay down a plastic sheet beneath the area for added fiber containment.
Ensure you're trained in asbestos handling, adhering to compliance standards like AS 1716:2003 for respiratory protection. Decontaminate tools and the sampling area using a HEPA vacuum or wet-wiping to remove residual dust. By following these specialized techniques, you help maintain safety and accuracy during the asbestos inspection process.
Importance of Compliance
Ensuring compliance with asbestos regulations is vital for anyone involved in renovation or demolition projects. Failing to adhere to these regulatory mandates can lead to severe legal consequences, including hefty fines and potential lawsuits. It's essential to understand that compliance not only protects you legally but additionally safeguards the health and safety of workers and occupants.
- Asbestos surveys are mandatory before any renovation or demolition.
- Accredited inspectors must conduct surveys and generate reports.
- Proper management of asbestos-containing materials (ACMs) is critical.
- Continuous monitoring and training help maintain safety standards.
Frequently Asked Questions
How Long Does an Asbestos Inspection Typically Take?
When considering inspection duration, it often varies based on site access requirements and building complexity. Typically, you can expect a few hours for small areas, while larger projects may stretch over multiple days.
What Should I Do if Asbestos Is Found?
If you find asbestos, prioritize safety precautions. Hire licensed professionals for asbestos removal, guaranteeing they follow strict protocols. Document all actions taken and maintain clear communication with relevant authorities throughout the process to verify compliance.
Who Should Conduct the Asbestos Inspection?
When it comes to asbestos inspections, you need certified professionals—licensed inspectors with the right credentials and experience. Their expertise guarantees your safety, traversing regulatory waters while providing accurate assessments of potential hazards in your environment.
How Much Does an Asbestos Inspection Cost?
Asbestos pricing for inspections typically ranges from $517 to $800, influenced by factors like area size, urgency, and sample types. Inspection fees may vary substantially, so it's advisable to obtain multiple quotes before proceeding.
Is Asbestos Inspection Required by Law?
Yes, asbestos inspection is required by law to guarantee regulatory compliance and fulfill legal obligations during renovations or demolitions. Certified professionals must conduct these inspections to manage asbestos risks effectively and protect health and safety.